
Tongariro Alpine Crossing
/The Tongariro National Park is decorated with a rare dual World Heritage Site status, noted for its Maori cultural and spiritual significance as well as its volcanic and geological features. The Tongariro Alpine Crossing, within the Park, is one of New Zealand’s most famous trails
At 19 kilometers in length, with over 700 meters in elevation gain, through rugged terrain and variable weather, the Tongariro Alpine Crossing trail is not to be taken lightly. In fact, a gentleman died (unknown cause) on the trail the day after I hiked it. Another man died (from exposure / hypothermia) on the trail one month earlier.
So, do your research, come prepared, and know your limits! Many websites and YouTube videos exist online, offering perspectives on how to prepare, what to bring, and what to expect. Here are a few links to get you started:
https://www.backpackerguide.nz/guide-to-the-tongariro-alpine-crossing/
https://wanderlusters.com/preparing-hike-tongariro-alpine-crossing/
https://www.hikingproject.com/trail/7011198/tongariro-alpine-crossing
New Zealand has great tourist information offices called iSites, located in major tourist towns. The iSite locations near Tongariro National Park (e.g., Turangi and Whakapapa Village) are very helpful in providing information about the Alpine Crossing and other hikes.
Again, I strongly encourage you to do your homework, and prepare accordingly.
That said, here are a few notes about my specific experience.
Where to Stay.
The largest city within an hour’s drive of the trailhead is Taupo, which offers a variety of lodging and eating options. I chose to stay a bit closer to the trailhead, in the town of Turangi. I booked the Tongariro Bridge Motel for three nights (see “weather” for more detail about why I did this). The motel had a cozy pub/restaurant as well as laundry facilities. It was a short 10-minute walk to the town center, which had a few more restaurants and a grocery store.
If you have a car, you might consider staying in Whakapapa Village which is even closer to the trailhead. The hotel in the village, Chateau Tongariro, is a classic hotel built in the 1920s, with a nice restaurant, lounge, and even a small cinema! (I actually ended up staying here for a few days after my hike!)
Weather.
For most of us, good weather is crucial for hiking safety. As you are planning your trip, pay careful attention to the weather. This is super important, and not to be taken lightly. You don’t want to be stuck out in the rugged, exposed terrain in big wind, rain, snow, or thunderstorms.
Weather uncertainty is the reason I booked three nights at the Tongariro Bridge Motel. I allowed myself an arrival night of Wednesday, a possible hike day either Thursday or Friday, and then a recovery night of Friday, checking out Saturday morning. As it turned out, I stayed put Thursday, and did the hike Friday – so I needed that extra day.
Here are the best sites for weather:
https://www.metservice.com/mountain/tongariro-national-park.
http://www.myweather2.com/City-Town/New-Zealand/Tongariro-National-Park/14-Day-Forecast.aspx.
I also used some of my sailing apps, like PredictWind.com and Windy.com, as a double- and triple-check.
Also, remember these volcanoes are active – so check for any warnings about volcanic activity.
The local iSite locations (e.g., Turangi and Whakapapa Village) are great resources for current and upcoming weather conditions as well.
Hike Logistics.
The trail is not a loop; it is one-way. Most hikers and tour operators begin at the Mangatepopo car park, and end at the Ketetahi car park. So, if you want to the do the entire one-way crossing, you’ll have to arrange your transport accordingly. Self-parking at either car park is limited to 4 hours, so you can only do that if you’re going to do a partial hike up and back (which certainly some people do).
Fortunately, finding such transport (via shuttle service) is pretty easy because the Alpine Crossing hike is the MAIN local attraction. At the Tongariro Bridge Motel, the front desk arranged for Alpine Shuttle to pick me up at the Motel and take me to the trailhead at Mangatepopo car park. I took the 6:00am pickup, but there was also a 7:30am pickup available. Included in the price ($55 NZD) was a return shuttle ride, leaving the finish line at Ketetahi car park at 3:00pm, 4:00pm, or 5:00pm, depending on when I finished the hike.
Alpine Shuttle was perfectly fine. At both car parks, I noticed several other shuttle services as well. So again, the transport shouldn’t be a problem; just ask at your hotel or iSite for assistance.
Hike Time.
The hike is just over 19 kilometers; guidelines suggest allowing 6-8 hours to complete. With the 6:00am shuttle, I was on the trail at 7:00am. I’m a fast walker, but I also take a lot of pictures. I finished the hike at 2:00pm. In hindsight, I could have spent an extra hour along the hike, soaking in the views, since the first shuttle wasn’t until 3:00pm.
Throughout New Zealand, I found the posted hiking-time estimates were pretty accurate for me. I’m 6’ tall, fit, and a fast walker. In the United States, I’m generally 10-20% faster than posted hiking-times, but in New Zealand I was < 10% faster. So be careful if you tend to be a bit slower. Make sure you allow yourself plenty of time, and be aware that New Zealand hiking-times might be less conservative than in the US.
Hike Characteristics.
As for the hike itself, it’s pretty spectacular. And yes, it’s technical, steep, and difficult in a few places. (Remember, you’re climbing to an altitude of nearly 2000 meters, so oxygen is limited!)
Make sure you are up for the challenge. Do some practice walks at home, or take advantage of the other shorter tracks that are in and around the Tongariro region. I recommend Taranaki Falls Trail, the Tama Lakes Trail, the Tongariro River Trail, and the Rotopounamu Lake Trail. There are many others.
You can read elsewhere online for a thorough walkthrough of the hike. Or watch some YouTube videos like this one: https://www.youtube.com/watch?v=45NKj651UEE&t=627s
From my experience, I think the middle part is the best part. The first couple of hours are basically the ascent to the craters and lakes. The next couple of hours are stunning, as you hike through the craters and along the lakes. There is a “fun” section that is a pretty steep descent down a scree field (loose sand, gravel, and rocks). I sat here, ate a sandwich, and watched people successfully (and unsuccessfully) navigate the path down. Then I took my turn and had some fun! Be careful though! The final couple of hours are, frankly, a bit boring – the view of the valley below is beautiful, but it doesn’t really change for two hours as you follow a well-defined trail down the mountain.
Gear.
In addition to good weather, proper gear is another element to hiking safety. Come prepared! So what does that mean? What do you bring? Again, there are lots of websites that already suggest what to bring. Here is a list of what I brought:
Clothing:
Shoes: North Face low-top hiking shoes (not boots), but they are Gore-tex so waterproof.
Socks: Wool hiking socks from REI
Pants: Mountain Hardwear MT6-U Pant
Underwear: ExOfficio Give-n-Go Sport Boxer Brief
Shirt: Icebreaker wool long sleeve, plus Gill long sleeve zip top
Hats: Fleece cap and baseball cap
Fleece: REI midweight fleece
Outer Layer: Columbia EvaPOURation Jacket
Extra Gear:
Gill sailing gloves (for the chain section)
Oakley sunglasses
Merino wool buff
Sunscreen
Waterproof flashlight (unknown brand)
Greatland rescue laser
Heimdall rescue whistle
25-feet Dyneema line
Extra shirt and socks (dry)
Two apples
Peanut butter packed in Ziploc bag
Mixed nuts, dried fruit, chocolate in Ziploc bag
3 liters of bottled water
Sea to Summit Dry Bags of various sizes to pack above items
REI Flash 18 backpack
Leatherman Charge Multitool
Trail map
Assortment of a few carabiners and buckling straps
Nikon Coolpix AW130
GoPro Hero 3+
iPhone
I ended up not needing a lot of the extra clothes and gear, but that’s the point. Better to have and not need, then need and not have.
Conclusion and “Reconsiderations”
What a fantastic hike! I’m grateful that the weather cooperated; I did my research and planned accordingly. I do have a couple of “reconsiderations.” (I was going to say “regrets” but it’s really hard to have any regrets!) There are two things I might do differently next time. First, I’d like to plan extra time to take the 2-hour detour and make the ascent to Mt. Ngauruhoe (Mt. Doom from Lord of the Rings). Second, I’d probably bring trekking poles to assist in the steep scree descent and to make better time on the flats. All in all though, I’m very pleased and satisfied with the Tongariro Alpine Crossing!

After the first hour or so, looking back down at the trailhead and valley.

In front of Mt. Ngauruhoe (Mt. Doom). Wish I had planned for the extra two-hours to make the ascent! (An optional portion of the Tongariro Alpine Crossing.)


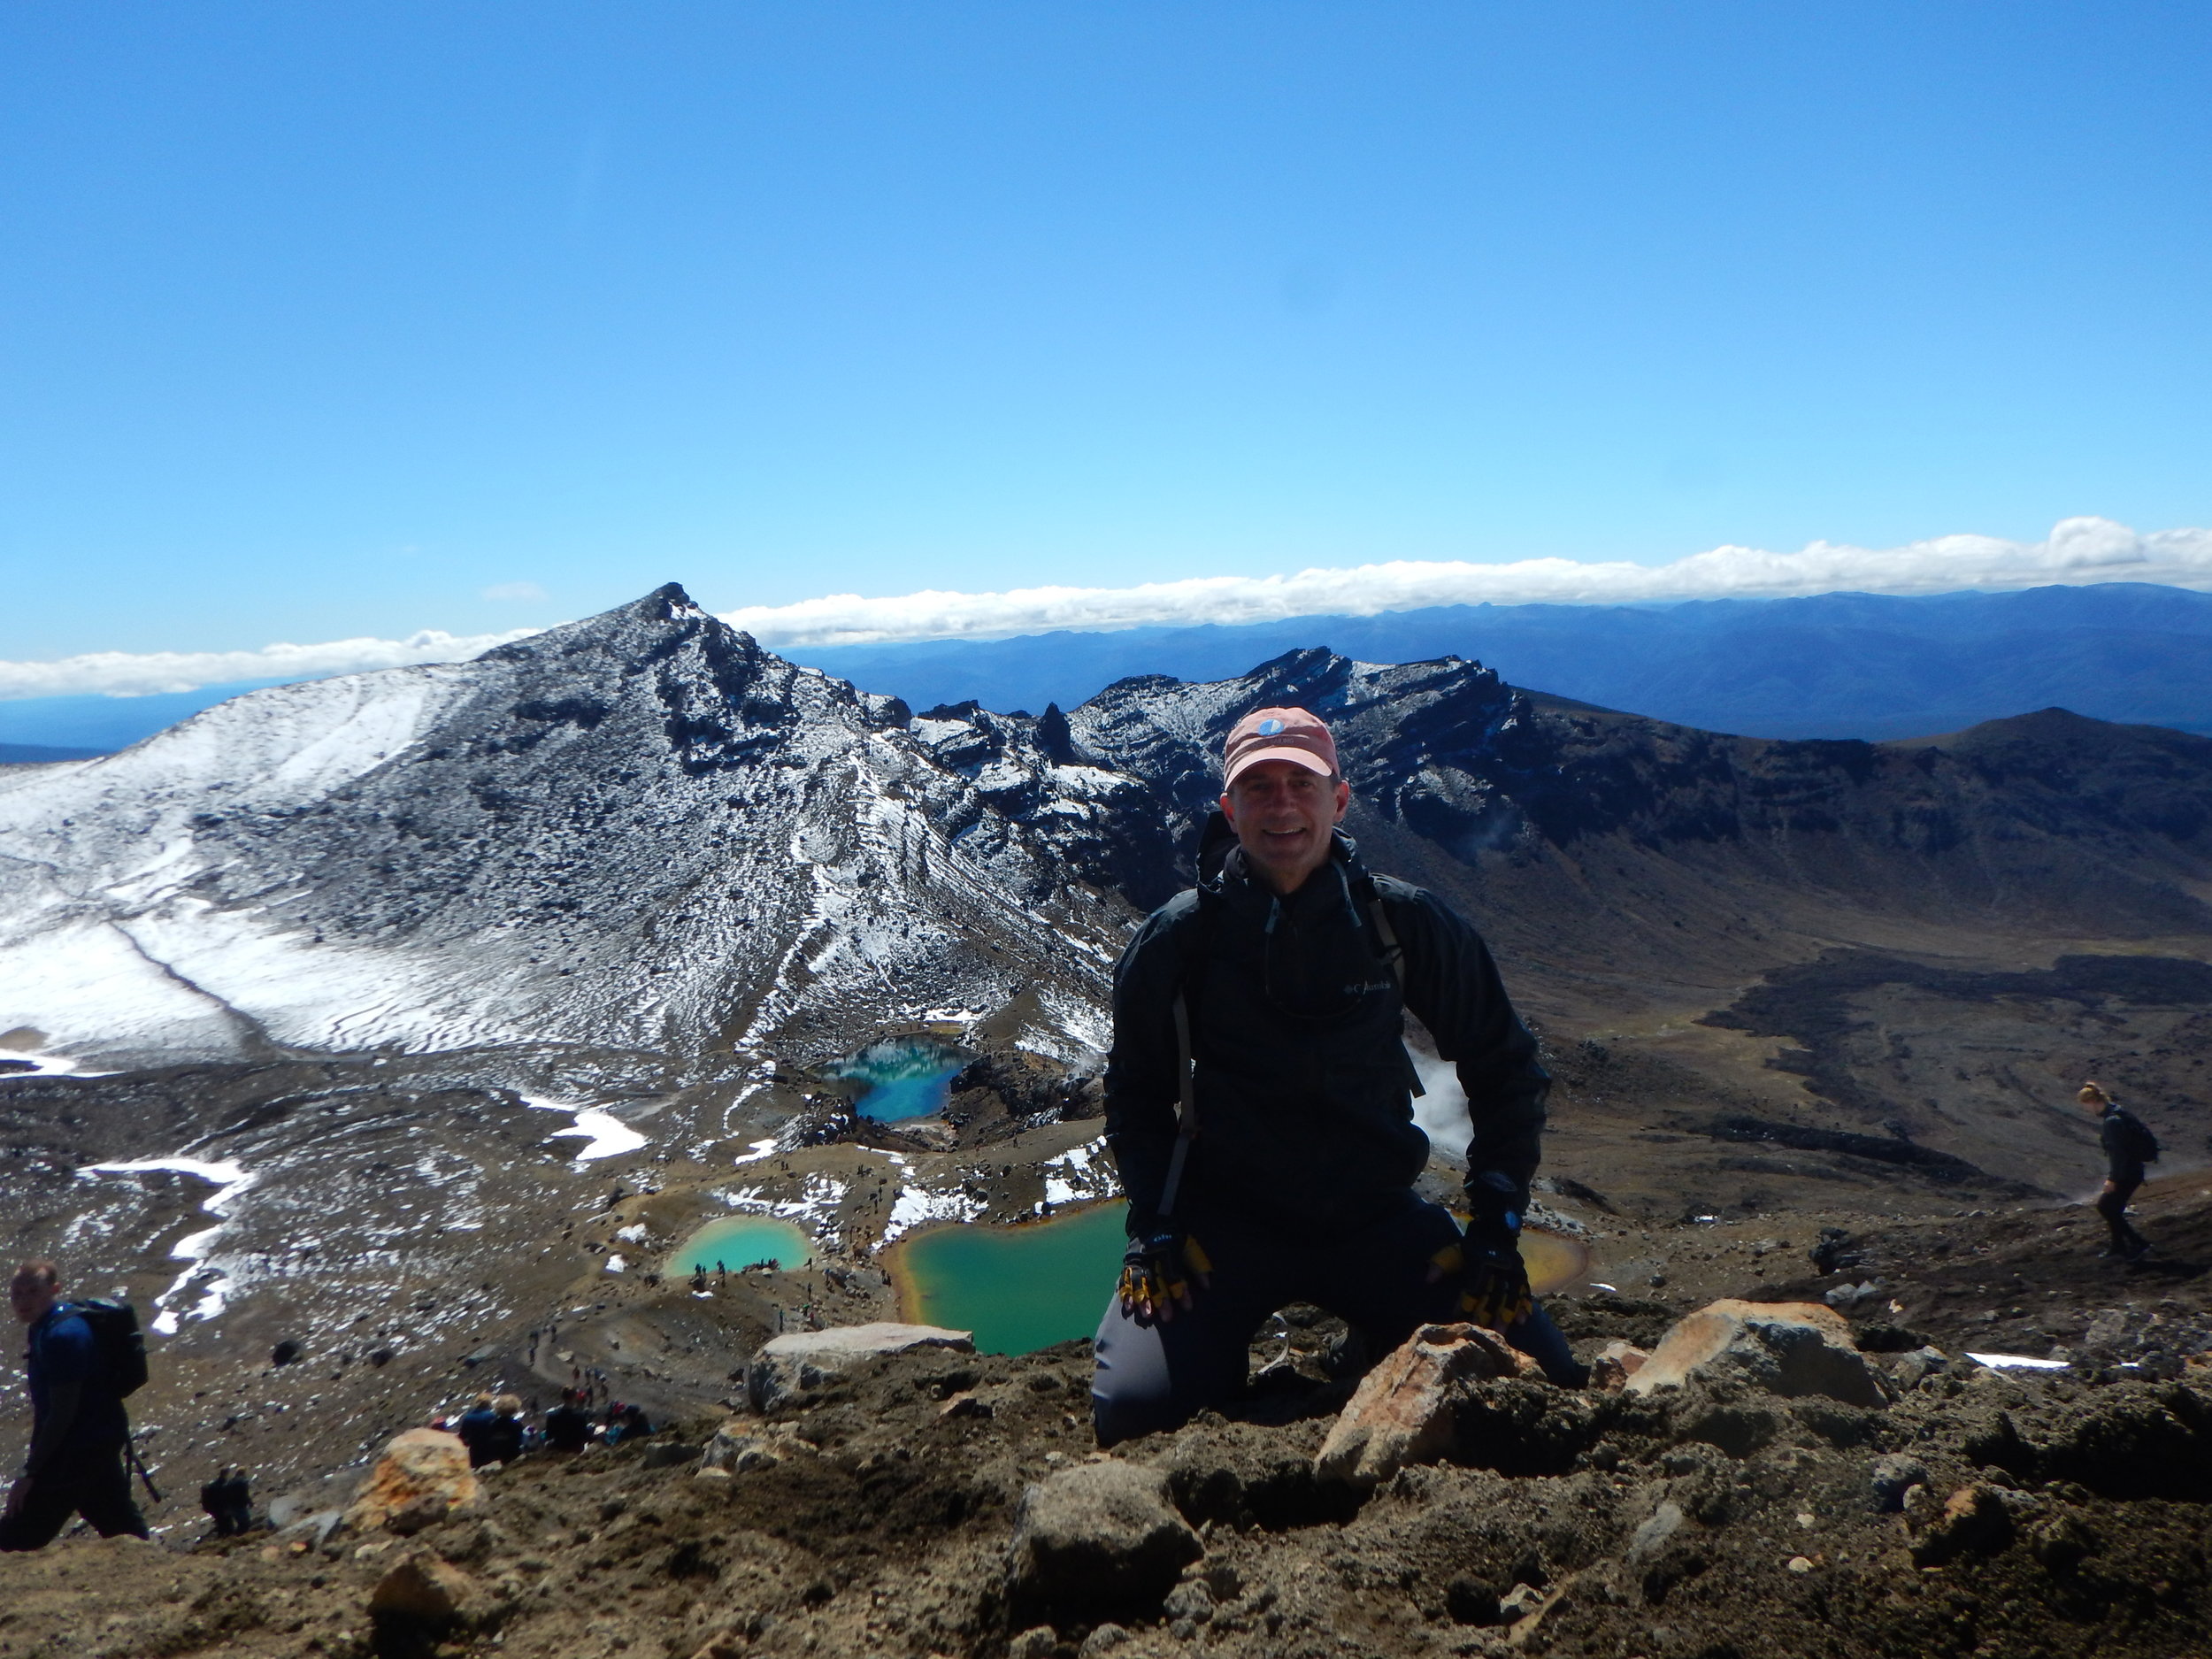
Looking down toward the Emerald Lakes, about the navigate the loose scree field descent!

One of the Emerald Lakes. Look but don’t touch. They are sacred to the Maori.

Another of the Emerald Lakes.


This is looking back across the trail, after passing the Emerald Lakes.


Walking along Blue Lake.

And the descent down to Ketetahi car park. It’s a long windy walk down with a great view.